
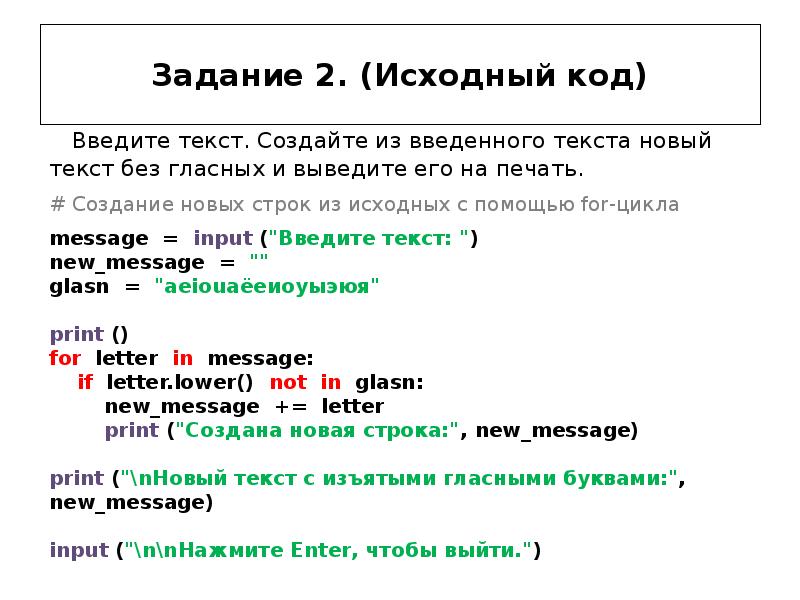
Как это работает в разных программах
Microsoft Office: В офисных программах Microsoft, таких как Word, Excel и PowerPoint, кнопка «Quit without saving» закрывает документ без сохранения внесенных изменений. Если вы случайно нажали на это действие, то все ваши изменения будут потеряны.
Adobe Photoshop: В Photoshop кнопка «Quit without saving» работает также, как и в Microsoft Office, закрывая окно без сохранения изменений. Если вы переживаете, что можете случайно нажать на эту кнопку, то можно использовать функцию автосохранения, чтобы избежать потери вашей работы.
Notepad: В текстовом редакторе Notepad, кнопка «Quit without saving» закрывает файл без сохранения изменений. Этот вариант может быть удобным, если вы хотите быстро выйти из файла, не сохраняя изменения.
Adobe Reader: В программе Adobe Reader, кнопка «Quit without saving» закрывает PDF-документ без сохранения изменений. Это может быть полезно в случаях, когда вы случайно открыли документ, который не нужен вам в дальнейшем.
Графические редакторы: В графических редакторах, таких как GIMP и PaintShop Pro, кнопка «Quit without saving» работает таким же образом, как и в Photoshop, закрывая окно без сохранения изменений.
В целом, «Quit without saving» является действием, которое удаляет все изменения, внесенные в файл, и закрывает его окно без сохранения
Поэтому необходима осторожность при использовании этой функции, чтобы не потерять свою работу
1.2 Quitting Without Saving Edits
When you are first learning
vi, especially if you are an intrepid experimenter,
there are two other ex commands that are handy for getting out of
any mess that you might create.
What if you want to wipe out all of the edits you have made in
a session and then return to the original file? The command:
returns you to the last saved version of the file, so you can start over.
Suppose, however, that you want to wipe out your edits and then
just quit vi?
The command:
quits the file you’re editing and returns you to the UNIX prompt.
With both of these commands, you lose all edits made in the
buffer since the last time you saved the file.
vi normally won’t let you throw away your edits. The
exclamation point added to the or command causes
vi to override this prohibition, performing the operation even
though the buffer has been modified.
1.2.1 Problems Saving Files
- You try to write your file, but you get one of the following messages:
-
Type file to overwrite the existing file, or type
newfile to save the edited version in a new file. - You want to write a file, but you don’t have write permission for
it. You get the message «Permission denied.» -
Use newfile to write out the buffer into a new file.
If you have write permission for the directory, you can use
to replace the original version with your copy of it.
If you don’t have write permission for the directory,
type pathname/file to
write out the buffer to a directory in which you do have write
permission (such as your home directory). - You try to write your file, but you get a message telling you that
the file system is full. -
Type junkfile to delete a (large) unneeded file and
free some space.
(Starting an ex command with an exclamation point gives you
access to UNIX.)
Or type to see whether there’s any space on another file system.
If there is, choose a directory on that file system and write your
file to it with pathname.
( is the UNIX command to check a
disk’s free space.) - The system puts you into open mode and tells you that the
file system is full. -
The disk with vi’s temporary files is filled up.
Type
\ to see whether there are any files you can remove to
gain some disk space.
If there are, create a temporary UNIX shell from which you can remove files or issue
other UNIX commands.
You can create a shell by typing ;
type
or to terminate the shell and return to vi. (On
a Berkeley UNIX system, you can simply type
to suspend vi and return to the UNIX prompt; type to return to
vi.)
Once you’ve freed up some space, write your file with . - You try to write your file, but you get a message telling you that your
disk quota has been reached. -
Try to force the system to save your buffer with the ex command
(short for ).
If that doesn’t work, look for some files to remove.
Use (or
if you are using a Berkeley system) to move out of vi and remove
files.
Use
(or ) to return to vi when you’re done.
Then write your file with .
1.2.2 Exercises
The only way to learn vi is to practice.
You now know enough to create a new file and to return to the
UNIX prompt.
Create a file called practice, insert some text, and then
save and quit the file.
Method 5: Downgrade the Version
Step 1: Press the Win + R keys together on your keyboard and the Run command window will open.
Step 2: In the Run command search box, write appwiz.cpl and hit Enter.
This will open the Programs an Features window in the Control Panel window.
Step 3: Next, navigate to the right side of the window and go to the Uninstall or change a program section.
Here, look for the program from the list, right-click on it and click on Uninstall.
*Note – Uninstalling the program does not affect the library or license key (if any)
Step 4: Now, go to the Silhouette Studio’s , and download and install its Legacy version (older version).
Последние заданные вопросы в категории Информатика
Информатика 15.12.2023 10:42 164 Двалишвили Майя
C++ Нехай с=10. Чому дорівнює х після виконання команди x=(c==3) ? 2+c : c-2; Виберіть одну
Ответов: 1
Информатика 15.12.2023 10:03 175 Абикенова Ерке
Сколько раз такимичи чуть не умер?
Ответов: 2
Информатика 15.12.2023 09:39 129 Шагас Артем
Придумать базу данных которая содержит 5 полей и 4 записи типы полей должны быть разными
Ответов: 2
Информатика 15.12.2023 08:01 39 Тарасов Влад
Write the following sums in sigma notation (i.e. using the symbol P): 7+12+17+22+27+32;
Ответов: 2
Информатика 15.12.2023 06:46 48 Прокопов Миша
Даны числа a и b найти сумму чисел между ними python
Ответов: 2
Информатика 15.12.2023 02:07 32 Власова Лена
10. Які параметри накреслення символів в даному реченні? Навчаючи інших, також вчися. а)
Ответов: 1
Информатика 15.12.2023 00:44 25 Полякова Наталья
До основних функцій текстового процесора належать срочно
Ответов: 2
Информатика 14.12.2023 19:52 47 Валеев Радмир
Дано целое число N (>0). Найти значение выражения 1.1 — 1.2 + 1.3… (N слагаемых, знаки
Ответов: 1
Информатика 14.12.2023 17:29 30 Осипова София
Встановіть відповідність між ТЕРМІНОМ «Ключові слова» ТА ЙОГО ПРИЗНАЧЕННЯМ 1 Слова, що вводяться
Ответов: 1
Информатика 14.12.2023 16:18 39 Стрельников Андрей
Найдите единицу измерения информацы
Ответов: 2
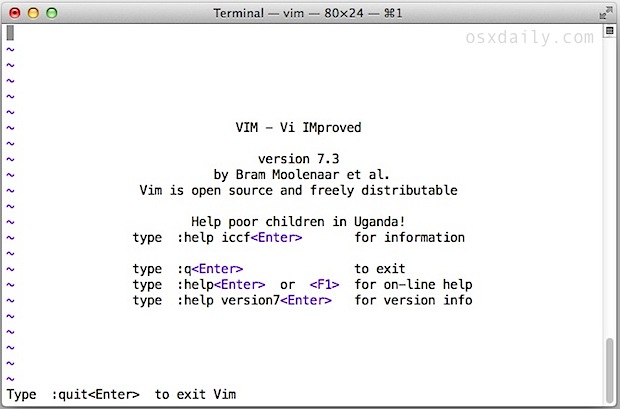
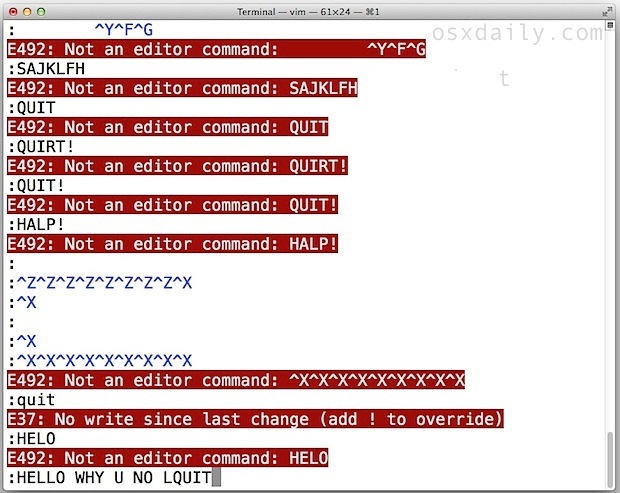
10 Ways How to Quit VIM / VI
This is a question that appears fairly often on command line articles… how on earth to actually quit out of VIM? It turns out there are literally , which is perhaps indicative of why VI baffles so many users. Let’s get to the easiest methods first:
Quit VIM without saving with ZQ
Hit the ESCAPE key, then hit SHIFT + ZQ
This will instantly quit out of VIM without saving, basically the same as the :q! command.
Quickly Quit VIM with Write & Save to File
Hit ESCAPE key, then SHIFT + ZZ
These are the two fastest ways to exit out of VIM for me personally, but everyone has their own opinions here and many prefer to type a command in the more traditional manner.
Quit VIM with :q
Hit the ESCAPE key, then type :q and hit RETURN
To be perfectly clear, hitting the “Escape” key enters into command mode. Then typing :q is literal, as in a colon not a semi-colon, so it would be Shift+; followed by q and hitting the Return key enters the command to quit.
This only works if no changes have been made to the document, so to quit if changes were made you make a slight adjustment and at a bang at the end:
Hit the ESCAPE key, then type :q! and hit RETURN
Quit VIM and write changes with :wq
Hit ESCAPE and type :wq and hit RETURN
This saves (writes) changes to the active file and quits. You can force this by adding a bang if necessary:
Hit ESCAPE and type :wq! followed by the RETURN key
This should help avoid this situation:

We can be a bit more thorough though and cover every possible way to quit VIM (at least that I know of courtesy of the man page, chime in the comments with more ways if there are others that we missed here), which we’ll get to next:
Every possible way to quit out of VIM
Hit ESCAPE key to enter into command mode first, then use any of the following :
- :q – quit
- :q! – quit without saving, even if modified
- :cq – quit always without writing
- :wq – write / save the current file and exit
- :wq! – write the current file and exit always
- :wq (name) – write to file (name) and exit
- :wq! (name) – write to the file (name) and exit always, even if modified
- ZZ – save the current file if modified, then exit
- ZQ – quit and exit without saving
- Launch a new terminal and type ‘killall vim’ – this is a joke that many will understand, and while not a proper way to quit out of vim it does work
So that’s how to escape VIM, any less confused? Perhaps not, and that’s OK, we’ll generally stick to using nano around here for walkthroughs because it’s more user friendly. And there’s nothing wrong with that, even though I’ve grown more comfortable with VIM over time, I still prefer nano out of ease and perhaps old stubborn habits.
For those interested in learning VIM or at least becoming more comfortable with it, you can always try the vimtutor command, use this excellent online interactive VIM tutorial, and just get more practice by using it often on any terminal. You can even get vim on your iPad or iPhone if you’re really committed. And at least you know how to quit out of vi now, right?
Summary of Document-Saving Procedure
A multi-document application that is not based on Cocoa’s document architecture has to do much more of the termination work itself. This work is similar to what does, as described in . In summary, the steps are the following:
-
The application delegate should implement to handle any request to quit the application or log out, restart, or shut down the system.
-
In the delegate should get an array of the application’s windows and determine if any associated documents have unsaved data.
-
If there are unsaved documents, the delegate displays an alert dialog asking the user if he or she wants to save the documents before quitting, discard any changes (and quit), or cancel the operation.
Of course, if there are no unsaved documents, the delegate should return , which tells the application object to proceed with termination (closing all windows, and so on).
-
If users want to review changes and save document data, the application delegate should, in , initiate the window-save procedure and return . Otherwise, it should return or , as appropriate.
-
In a window-save routine, each window with unsaved data should display a sheet asking users if they wish to save the document, close the window without saving, or cancel the operation. Each window should display its sheet in an orderly sequence, not all at once, and should respond appropriately to the user’s choice.

Because the goals are the same (saving document data), the code used for this purpose can be the same code that is executed when the user closes the window (typically invoked by the window’s delegate in ).
-
After all document data has been saved (or when users choose “close without saving”), send to the application object () with an argument of .
If the user is logging out, or is restarting or shutting down the system, You need to send within two minutes after returning in or the procedure will time out.
-
When the application object gets the go-ahead for termination, it closes any open window (among other things). This results in the invocation of the delegation method in which the delegate can perform any necessary tasks (clean-up, for example) related to the window.
-
Just before the application ceases execution, the application delegate method is invoked; here the delegate can perform any tasks related to the application itself, such as writing out application preferences.


![[chapter 1] 1.2 quitting without saving edits](https://podomu.info/wp-content/uploads/2/2/5/225e996309e2d0ab84f666275e73c1bb.jpeg)
![[chapter 1] 1.2 quitting without saving edits](https://podomu.info/wp-content/uploads/d/f/9/df990b9aa0192f4aeca3427a268b63f2.jpeg)


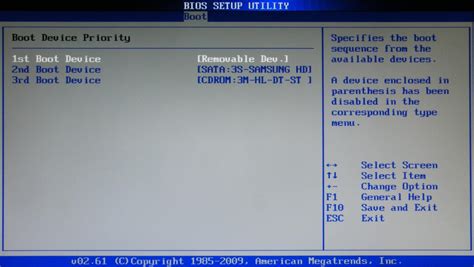
Варианты выхода из БИОС
Для выхода из BIOS Setup Utility можно использовать два варианта:
— Выход с БИОС с сохранением результатов произведенных изменений
(обычно данной операции так же соответствует клавиша F10 — при нахождении в первой, главной вкладке)
Если не нужно сохранить изменения настроек BIOS, то при выходе необходимо выполнить следующее:
В главном окне вызываем опцию “Exit Without Sawing” (название может быть намного другое, например, “Quit Without Sawing, Discard Changes and Reset” — без сохранения). Откроется окно с сообщением “Exit Without Sawing (Y/N)”.
Рис 1. Подтверждение выхода из БИОС без подтверждения изменений.
Нажимаем клавишу “Y” и “Enter”. Вы выйдете из БИОСа без сохранения изменений, продолжится загрузка компьютера.
Когда не нужно сохранять изменения в настройках BIOS Setup:
— если Вами случайно был изменен один или несколько параметров;
— если Вы не уверены в правильности своих действий;
— если Вы не вносили каких-либо изменений.
Для Выхода с БИОС с сохранением всех внесенных изменений в главном окне выбираем опцию “Save & Exit Setup” (или Save Changes and Reset). Откроется окно с сообщением “SAVE to CMOS and EXIT (Y/N)”.
Рис 2. Подтверждение выхода из БИОС с сохранением изменений.
Нажимаем клавишу “Y” и “Enter”. Вы выйдете из БИОСа, все изменения будут сохранены, продолжится загрузка компьютера.
Отмечу, что сохранять внесенные изменения следует только в том случае, если Вы уверены в правильности своих действий.
Все выше изложенное относиться к BIOS Setup со стандартным интерфейсом. Если Ваш БИОС имеет интерфейс со строкой меню у верхней части, то для выхода с данной программы необходимо перейти на пункт Exit в главном меню. И уже в данном пункте использовать команды “Exit Without Sawing” и “Save & Exit Setup”.
Результат нажатия функциональной клавиши F10 при нахождении в основных — главных вкладках БИОса (аналог “Save & Exit Setup” или Save Changes and Reset):
Примечание 1: Как правило клавиши завершения работы в BIOS — Esc и F10 (дублирующие соответствующие пункты меню) срабатывают везде, но в некоторых версиях они не работают если вы находитесь в подпунктах — на вложенных окнах диалогов, а не на одной из центральных вкладок.
Примечание 2: Стоит отдельно отметить очень важную опцию располагающуюся в одной группе с выше рассмотренными (варианты обозначения):
- Restore Default
- Load Defaults BIOS
- Load BIOS Setup Defaults,
- Load Safe-Fail Defaults
Данная опция позволяет сбросить все изменения проведенные в БИОСе на заводские — дефаултные значения. Если вход в Биос заблокирован паролем, то можно сбросить все настройки (в том числе и пароль) и другими способами описанными здесь.
Данная опция является обязательно при первой загрузке вновь собранного компьютера, а так же при замене процессора, материнской платы в противном случае возможны различные глюки — например постоянный перегрев процессора (писк спикера) в независимости от нагрузки — при этом на ощупь он будет чуть теплее рук и тд.
Потеря данных и утрата проделанной работы

Последствия таких действий могут быть серьезными. В первую очередь, пользователь потеряет все несохраненные изменения, которые могут представлять большую ценность и занимать много времени. Если это произошло в рамках работы над проектом или документом, то это может привести к значительным задержкам и необходимости начинать все сначала.
Потеря данных может повлечь за собой и финансовые потери, особенно в случае работы с важными бизнес-данными или клиентской информацией. Компании могут столкнуться с проблемами, связанными с утратой конфиденциальных данных, общественным неудовлетворением или уменьшением продуктивности.
Чтобы избежать потери данных и утраты проделанной работы, следует принимать несколько мер предосторожности. Например, регулярно сохранять изменения в документе или проекте, использовать функцию автосохранения, аккуратно закрывать программы и документы
Также рекомендуется резервировать данные, делая регулярные копии проектов и документов на внешние носители или в облачное хранилище.
Необходимо также обучать пользователей основным правилам безопасности данных и предупреждать их о рисках, связанных с «quit without saving»
Обратите внимание, что предотвратить потерю данных и утрату проделанной работы полностью невозможно, поэтому важно быть готовым к таким ситуациям и иметь план восстановления данных в случае необходимости
Cleaning Up
In terminating your application gracefully, there is really not much you typically need to do after saving document data. The objects that comprise an application generally take care of freeing used objects and allocated resources. There are a couple exceptions to this. One is to make sure that objects such as windows with external references have those references removed. One such case is a delegate. In Text Edit’s method (which is invoked right after ), the delegate of the window removes itself as a reference on the window (Listing 6).
Listing 6 Removing a reference in windowWillClose:
- (void)windowWillClose:(NSNotification *)notification {
|
NSWindow *window = ; |
; |
; |
} |
Another case where final tidying up might be necessary is when you need to save persistent data. User preferences are one such case, and is an ideal place to save them. Listing 7 illustrates how Text Edit makes use of .
Listing 7 Saving user preferences in applicationWillTerminate:
- (void)applicationWillTerminate:(NSNotification *)notification {
|
; |
} |
Как отключить функцию «Quit without saving»
Функция «Quit without saving» в биосе позволяет завершить работу компьютера без сохранения текущих настроек и изменений. Однако, в некоторых случаях может быть необходимо отключить данную функцию для предотвращения потери данных.
Для отключения функции «Quit without saving» в биосе необходимо выполнить следующие шаги:
Шаг 1:
Запустите компьютер и нажмите клавишу DEL (или указанную клавишу удаления, обычно это может быть F2 или F10) при появлении сообщения о входе в биос.
Шаг 2:
При входе в биос найдите раздел «Exit» (Выход) или «Advanced» (Расширенные настройки) с помощью стрелок на клавиатуре.
Шаг 3:
В найденном разделе найдите опцию «Quit without saving» (Завершить без сохранения) и отметьте ее с помощью клавиш вверх/вниз или соответствующего символа.
Шаг 4:
Выберите опцию «Disable» (Отключить) или «No» (Нет) для функции «Quit without saving».
Шаг 5:
Нажмите клавишу Enter для сохранения изменений и выхода из биоса.
После выполнения данных шагов, функция «Quit without saving» будет отключена, и компьютер будет требовать сохранения изменений перед выходом.
Функция «Quit without saving» в биосе представляет собой возможность выйти из настроек биоса без сохранения внесенных изменений. Она позволяет пользователю отменить все внесенные настройки и вернуться к предыдущим значениям.
Включение этой функции в биосе имеет несколько важных преимуществ. Во-первых, она предоставляет дополнительный уровень защиты от случайных или неправильных изменений настроек. Если пользователь ошибся и внес неправильные настройки, он может выбрать «Quit without saving» и вернуться к предыдущим значениям без сохранения изменений.
![[chapter 1] 1.2 quitting without saving edits](https://podomu.info/wp-content/uploads/8/8/7/8876689834379d2628b2f6beefae279a.jpeg)


Во-вторых, функция «Quit without saving» позволяет избежать потери всех настроек в случае неправильных или несовместимых изменений. Если пользователь сделал несколько изменений, но затем понял, что они привели к неправильной работе компьютера, он может выбрать эту функцию и вернуться к предыдущим настройкам без сохранения изменений.
Однако, стоит отметить, что использование функции «Quit without saving» следует проводить с осторожностью. Пользователь должен быть уверен в том, что он действительно хочет отменить все внесенные изменения, так как функция не предоставляет возможности для восстановления данных после отказа от сохранения. В целом, функция «Quit without saving» в биосе является полезным инструментом для отмены и перехода к предыдущим настройкам без сохранения изменений
Она предоставляет дополнительный уровень защиты от ошибок и помогает избежать потери данных при неправильных изменениях настроек
В целом, функция «Quit without saving» в биосе является полезным инструментом для отмены и перехода к предыдущим настройкам без сохранения изменений. Она предоставляет дополнительный уровень защиты от ошибок и помогает избежать потери данных при неправильных изменениях настроек.
10 Ways How to Quit VIM / VI
This is a question that appears fairly often on command line articles… how on earth to actually quit out of VIM? It turns out there are literally , which is perhaps indicative of why VI baffles so many users. Let’s get to the easiest methods first:
Quit VIM without saving with ZQ
Hit the ESCAPE key, then hit SHIFT + ZQ
This will instantly quit out of VIM without saving, basically the same as the :q! command.
Quickly Quit VIM with Write & Save to File
Hit ESCAPE key, then SHIFT + ZZ
These are the two fastest ways to exit out of VIM for me personally, but everyone has their own opinions here and many prefer to type a command in the more traditional manner.
Quit VIM with :q
Hit the ESCAPE key, then type :q and hit RETURN
To be perfectly clear, hitting the “Escape” key enters into command mode. Then typing :q is literal, as in a colon not a semi-colon, so it would be Shift+; followed by q and hitting the Return key enters the command to quit.
This only works if no changes have been made to the document, so to quit if changes were made you make a slight adjustment and at a bang at the end:
Hit the ESCAPE key, then type :q! and hit RETURN
Quit VIM and write changes with :wq
Hit ESCAPE and type :wq and hit RETURN
This saves (writes) changes to the active file and quits. You can force this by adding a bang if necessary:
Hit ESCAPE and type :wq! followed by the RETURN key
This should help avoid this situation:
We can be a bit more thorough though and cover every possible way to quit VIM (at least that I know of courtesy of the man page, chime in the comments with more ways if there are others that we missed here), which we’ll get to next:
Every possible way to quit out of VIM
Hit ESCAPE key to enter into command mode first, then use any of the following :
- :q – quit
- :q! – quit without saving, even if modified
- :cq – quit always without writing
- :wq – write / save the current file and exit
- :wq! – write the current file and exit always
- :wq (name) – write to file (name) and exit
- :wq! (name) – write to the file (name) and exit always, even if modified
- ZZ – save the current file if modified, then exit
- ZQ – quit and exit without saving
- Launch a new terminal and type ‘killall vim’ – this is a joke that many will understand, and while not a proper way to quit out of vim it does work
So that’s how to escape VIM, any less confused? Perhaps not, and that’s OK, we’ll generally stick to using nano around here for walkthroughs because it’s more user friendly. And there’s nothing wrong with that, even though I’ve grown more comfortable with VIM over time, I still prefer nano out of ease and perhaps old stubborn habits.

For those interested in learning VIM or at least becoming more comfortable with it, you can always try the vimtutor command, use this excellent online interactive VIM tutorial, and just get more practice by using it often on any terminal. You can even get vim on your iPad or iPhone if you’re really committed. And at least you know how to quit out of vi now, right?
Практические примеры применения функции «Выход без сохранения» в системном BIOS
В данном разделе рассмотрим несколько ситуаций, когда функция «Выход без сохранения» в системном BIOS может оказаться полезной. Мы рассмотрим практические примеры, в которых данная функция может быть использована для удобного и безопасного управления настройками компьютера.
Переключение между конфигурациями системы
Возможность сохранять и восстанавливать различные конфигурации системы в BIOS является важной возможностью для многих пользователей. Однако, в некоторых случаях может возникнуть необходимость быстро переключиться между различными конфигурациями без сохранения изменений
Например, если вы тестируете различные настройки процессора или памяти, вы можете использовать функцию «Выход без сохранения», чтобы быстро вернуться к предыдущей стабильной конфигурации.
Восстановление стандартных настроек
Когда вы выполняете различные модификации настроек в BIOS, иногда может возникнуть необходимость сбросить все значения на стандартные. Вместо того чтобы вручную изменять каждую настройку обратно, вы можете использовать функцию «Выход без сохранения», чтобы вернуться к исходным параметрам. Это особенно полезно, когда вы не уверены, какие изменения вызвали проблемы, и хотите вернуться к стандартным настройкам быстро и безопасно.
Отмена случайных изменений
Иногда бывает так, что в процессе работы с настройками BIOS вы случайно изменяете некоторые параметры и не замечаете этого до тех пор, пока не возникнут проблемы. Вместо того чтобы проходить через все настройки и вручную возвращать все обратно, вы можете использовать функцию «Выход без сохранения», чтобы отменить случайные изменения и вернуться к предыдущим настройкам, которые были стабильными и работоспособными.
| Практическое использование | Описание |
|---|---|
| Переключение между конфигурациями системы | Быстрое переключение между различными конфигурациями системы без сохранения изменений |
| Восстановление стандартных настроек | Быстрый сброс всех настроек BIOS на значения по умолчанию |
| Отмена случайных изменений | Возврат к предыдущим стабильным настройкам после случайных изменений |
Method 4: Reinstall Silhouette Studio
This method needs you to first disable any antivirus on your PC, create a backup of your app’s library and then proceed with the below steps to reinstall the Silhouette Studio app.
*Note – If you are using a paid version of the app then, you must disable the license key. For this, go to the app’s Help section and the Deactivate license key. Once done, exit the app.
Step 1: Right-click on Start menu and select Run.
Step 2: This will open the Run command window.
Type appwiz.cpl in the search field and press OK to launch the Programs and Features window in the Control Panel window.
Step 3: In the Programs and Features window, go to the right side of the window and under the Uninstall or change a program, locate the program from the list.
Right-click on it and select Uninstall.
Step 4: Once the uninstallation is complete, press the Win + R hotkey on your keyboard to open the Run command window.
Step 5: In the search field, type control folders and hit Enter to open the File Explorer Options window.
Step 6: In the File Explorer Options window, select the View tab and under the Advanced settings field, go to the Hidden files and folders section.
Now, select the Show hidden files, folders and drives option.
Press Apply and then OK to save the changes and exit.
Step 7: Now, right-click on Start and select Run.
Step 8: This will open the Run command window.
Here, type %programdata% in the search box and press OK to open the ProgramData folder in the File Explorer.
Step 9: Next, in the ProgramData folder, select the below folders and hit Delete:
com.aspexsoftware.Silhouette_Studio./com.aspexsoftware.Silhouette_Studio.8

com.aspexsoftware.Silhouette_Studio.licence

com.silhouetteamerica.silhouette_link
Step 10: Now, simply right-click on the Start menu again and click on Run to launch the Run command again.
Step 11: In the Run command search field, write %appdata% and hit Enter.
Step 12: This will open the AppData > Roaming folder in the Windows Explorer.
Here, select the below folders and hit Delete to remove all of them:
com.aspexsoftware.Silhouette_Studio
com.aspexsoftware.ss_bluetooth
com.aspexsoftware.studio_helper
com.silhouettesoftware - Silhouette America
Once done, empty the computer’s recycle bin and restart your PC.
Now, go to the Silhouette Studio’s software download page to download the latest version of the app based on your PC’s system architecture (32-bit/64-bit).
*Note – Refer to this article to learn how to check if your Windows 10 PC is 32-bit or 64-bit.
Существенные моменты, которые требуется учесть при применении опции «Выход без сохранения»

При использовании функции «Выход без сохранения» во время работы с биосом, важно помнить об определенных ключевых моментах, которые могут оказать влияние на процесс и сохраненные данные. На самом базовом уровне, данная функция позволяет завершить работу в биосе без сохранения изменений
| 1. | Окно настроек BIOS |
| 2. | Отказ от сохранения |
| 3. | Потеря данных |
| 4. | Возможные последствия |
Во-первых, применение функции «Выход без сохранения» находится внутри окна настроек BIOS. Это означает, что все изменения, которые вы внесли в BIOS, такие как настройки загрузки, порядок устройств или частоты процессора, не будут сохранены, если вы выберете эту опцию.

Во-вторых, выбор отказа от сохранения влечет за собой потерю всех сделанных изменений. Это может быть полезно в случае, если вы не уверены в правильности внесенных настроек и хотите вернуться к предыдущим действиям, без сохранения новых значений.
Однако, стоит отметить, что при выборе «Выход без сохранения» существует риск потери данных. Если вы внесли важные изменения или настройки в BIOS и не сохранили их перед выходом без сохранения, все эти данные могут быть утеряны, и вам придется повторить все настройки заново.
Важно также учитывать возможные последствия использования опции «Выход без сохранения». При неправильном использовании, это может привести к непредсказуемым проблемам, включая неработоспособность компьютера или ошибки в работе операционной системы. В итоге, при использовании опции «Выход без сохранения» в биосе, необходимо внимательно взвесить все риски и потенциальные последствия
В итоге, при использовании опции «Выход без сохранения» в биосе, необходимо внимательно взвесить все риски и потенциальные последствия
Правильное применение этой функции может помочь избежать нежелательных изменений или неисправностей в системе, но всегда рекомендуется проявлять осторожность и дублировать важные данные перед внесением изменений в биосе
1.2 Quitting Without Saving Edits
When you are first learning
vi, especially if you are an intrepid experimenter,
there are two other ex commands that are handy for getting out of
any mess that you might create.
What if you want to wipe out all of the edits you have made in
a session and then return to the original file? The command:
returns you to the last saved version of the file, so you can start over.
Suppose, however, that you want to wipe out your edits and then
just quit vi?
The command:
quits the file you’re editing and returns you to the UNIX prompt.
With both of these commands, you lose all edits made in the
buffer since the last time you saved the file.
vi normally won’t let you throw away your edits. The
exclamation point added to the or command causes
vi to override this prohibition, performing the operation even
though the buffer has been modified.
1.2.1 Problems Saving Files
- You try to write your file, but you get one of the following messages:
-
Type file to overwrite the existing file, or type
newfile to save the edited version in a new file. - You want to write a file, but you don’t have write permission for
it. You get the message «Permission denied.» -
Use newfile to write out the buffer into a new file.
If you have write permission for the directory, you can use
to replace the original version with your copy of it.
If you don’t have write permission for the directory,
type pathname/file to
write out the buffer to a directory in which you do have write
permission (such as your home directory). - You try to write your file, but you get a message telling you that
the file system is full. -
Type junkfile to delete a (large) unneeded file and
free some space.
(Starting an ex command with an exclamation point gives you
access to UNIX.)
Or type to see whether there’s any space on another file system.
If there is, choose a directory on that file system and write your
file to it with pathname.
( is the UNIX command to check a
disk’s free space.) - The system puts you into open mode and tells you that the
file system is full. -
The disk with vi’s temporary files is filled up.
Type
\ to see whether there are any files you can remove to
gain some disk space.
If there are, create a temporary UNIX shell from which you can remove files or issue
other UNIX commands.
You can create a shell by typing ;
type
or to terminate the shell and return to vi. (On
a Berkeley UNIX system, you can simply type
to suspend vi and return to the UNIX prompt; type to return to
vi.)
Once you’ve freed up some space, write your file with . - You try to write your file, but you get a message telling you that your
disk quota has been reached. -
Try to force the system to save your buffer with the ex command
(short for ).
If that doesn’t work, look for some files to remove.
Use (or
if you are using a Berkeley system) to move out of vi and remove
files.
Use
(or ) to return to vi when you’re done.
Then write your file with .
1.2.2 Exercises
The only way to learn vi is to practice.
You now know enough to create a new file and to return to the
UNIX prompt.
Create a file called practice, insert some text, and then
save and quit the file.