
Введение
Международное движение KeepItOn опубликовало в начале июня отчёт с результатами глобального исследования по теме выявления случаев блокировки доступа к интернету в 2021 году.
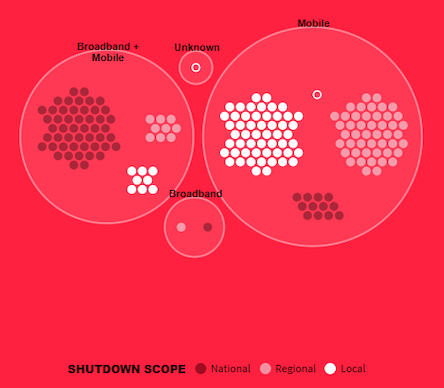
Согласно полученным данным, в течение прошлого года было зарегистрировано 182 таких инцидента в 34 странах мира. Их масштаб был различным, от общей блокировки глобального трафика до местного ограничения доступа к интернету. Учитывались случаи как отключения доступа только в мобильных сетях на ограниченной территории, так и полной блокировки в мобильных и магистральных сетях.
По собранной статистике проведён анализ инструментов, которые применялись для реализации того или иного вида блокировки. Названы способы, позволяющие выявить случаи блокировки, а также обойти их, если есть такая возможность. Поскольку данные собирались сразу из разных источников, можно говорить о высокой степени достоверности опубликованных результатов.
Движение KeepItOn существует с 2016 года. Оно объединяет в своих рядах свыше 280 организаций различного профиля из 105 стран мира. Партнёрами сообщества выступают самые разные организации: представители гражданского общества, местные и международные СМИ, правительства стран, региональные и международные управляющие органы, межправительственные организации, провайдеры телекоммуникационных и интернет-услуг, технические платформы, отраслевые ассоциации, исследовательские центры и ЦОДы, центры сетевых измерений, дипломатические миссии и многие другие.
В число партнёров KeepItOn входят и крупные технологические компании, такие как Oracle, Google, Meta (организация, признанная в России экстремистской), Cloudflare, Mozilla, различные сообщества, например Internet Outage Detection & Analysis (IODA) и Open Observatory of Network Interference (OONI), ряд специализированных веб-сайтов.
Авторизация
Первым шагом в обеспечении безопасности всегда является аутентификация: процесс
идентификации пользователя. В Symfony аутентификацию можно выполнять различными
способами, начиная с базовой HTTP аутентификации и формы логина и заканчивая
Facebook.
После того как пользователь аутентифицирован, начинается процесс авторизации.
Авторизация является стандартным путём определения имеет ли пользователь
право доступа к какому-либо ресурсу (URL, объект модели, вызов метода…).
В основе этого процесса лежит присвоение некоторых ролей каждому пользователю
и после этого для различных ресурсов можно требовать наличия различных ролей.
Авторизация имеет две различные грани:
- Пользователю назначен некоторый набор ролей;
- Ресурс требует наличия некоторых ролей для получения доступа к нему.
В этой секции вы узнаете о том, как защитить различные ресурсы (например, URL,
вызов метода и т.д.) при помощи различных ролей. Затем, вы узнаете о том, как
создаются роли и как их можно присвоить пользователю.
Защищаем URL по шаблону
Наиболее простой и понятный способ защиты вашего приложения — защита некоторого
набора URL по шаблону. Вы уже видели ранее, в первом примере этой главы, где
все URL, что соответствовали регулярному выражению , требовали
роли .
Вы можете определить столько URL, сколько вам нужно — каждый при помощи шаблона
для регулярного выражения:
Tip
Добавление в начало пути символа гарантирует, что этому шаблону
будут соответствовать лишь URL, которые начинаются c него. Например,
путь (без в начале) будет соответствовать как URL ,
так и URL .
Для каждого входящего запроса, Symfony2 пытается найти соответствующее правило
контроля доступа (используется первое найденное правило). Если пользователь
ещё не прошёл аутентификацию, инициируется процесс аутентификации (т.е.
пользователю предоставляется возможность залогиниться в систему). Если же
пользователь уже прошёл аутентификацию, но не имеет требуемой роли, будет
брошено исключение ,
которое вы можете обработать и показать пользователю красивую страничку
“access denied”. Подробнее читайте в книге рецептов: /cookbook/controller/error_pages
Так как Symfony использует первое найденное правило, URL вида
будет соответствовать первому правилу и требовать наличия роли .
Любой URL вида будет соответствовать второму правилу и требовать
наличия роли .
Защита по IP
В жизни могут возникать различные ситуации, в которых вам будет необходимо
ограничить доступ для некоего маршрута по IP
Это особенно важно в случае
использования (ESI), которые,
например, используют маршрут под названием “_internal”. Когда используются
ESI, маршрут _internal необходим кэширующему шлюзу для подключения различных
опций кэширования субсекций внутри указанной страницы
Этот маршрут по умолчанию
использует префикс ^/_internal в Symfony Standard Edition (предполагается
также что вы раскомментировали эти строки в файле маршрутов).
Ниже приводится пример того, как вы можете защитить этот маршрут от
доступа извне:
Защита Контроллера
Защищать ваше приложение на основании шаблонов URL легко, но в некоторых случаях
может быть не слишком удобным. При необходимости, вы также можете легко
форсировать авторизацию внутри контроллера:
<?php
use Symfony\Component\Security\Core\Exception\AccessDeniedException;
// ...

public function helloAction($name)
{
    if (false === $this->get('security.context')->isGranted('ROLE_ADMIN')) {
        throw new AccessDeniedException();
    }

    // ...
}
Вы также можете использовать опциональный пакет ,
который поможет вам защитить контроллер с использованием аннотаций:
<?php
use JMS\SecurityExtraBundle\Annotation\Secure;

/**
 * @Secure(roles="ROLE_ADMIN")
 */
public function helloAction($name)
{
    // ...
}
Дополнительную информацию об этом пакете вы можете получить из документации
JMSSecurityExtraBundle. Если вы используете дистрибутив Symfony Standard Edition,
этот пакет уже доступен вам по умолчанию. В противном случае вам необходимо
загрузить и установить его.
Защита прочих сервисов
Подробнее о том как вы можете использовать компонент безопасности для
защиты различных сервисов и методов в вашем приложении, смотрите статью
в книге рецептов: /cookbook/security/securing_services.
Disabling login Accessibility upon account lifetime expiration
The user accounts you create in Linux have a lifetime, that is, they have account expiration, if we can change the expiration date to a date in the past, the lifetime of the user account will expire in the kernel. Therefore, the Linux kernel prevents the login of an expired user account. To change the expiration date of the user account, you can use thecommand:
By changing the expiration date of the user account to the previous day, we defined the user account as expired today, and if the specified user account wants to log in to the Linux system today, it has expired and the login access has been disabled. (Current date: Jan 26 and the expiration date: Jan 25.)
How To Tell If Someone Blocked You On Facebook Or Deactivated Their Account?
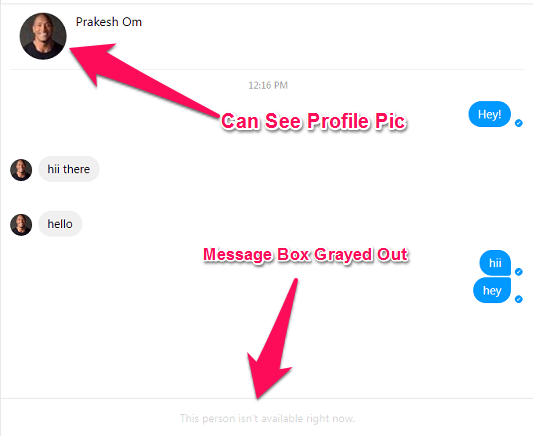
Check Recent Conversation
Open the conversation that you might have had earlier with that person on Facebook chat. If their profile picture is visible to you but you cannot go to their profile by clicking on their profile pic then it is a sign that you are blocked by them.
Moreover, you won’t be able to send messages to that person as well.
To confirm, you can open this conversation in the messenger. If you can see their pic but the message box is disabled then it means that you have been blocked.
Observations in case you are blocked
However, if the person has not blocked you but left Facebook by deactivating their account then obviously you cannot message or visit their profile similar to blocking.
But in the case of deactivation, you will not see their profile pic in the conversation as well. You may also see Facebook user (read here about what Facebook user means).
However, keep in mind that only seeing a blank profile image does not mean the person got their profile deactivated; read our post about the blank Facebook profile to learn about all possible reasons for that.
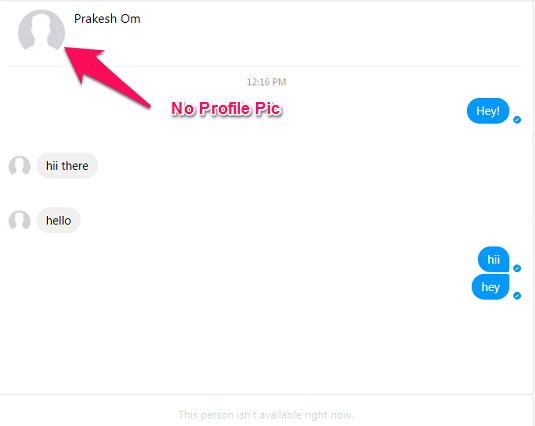
Observations that user has deactivated FB account
This is the main difference between someone blocking you or deactivating their account.
Do Facebook Search
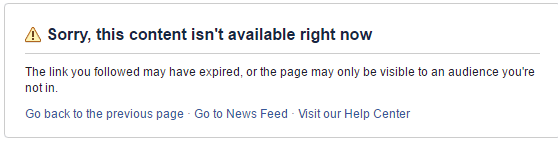
Try searching the person in question using the FB search bar at the top.
Either you won’t find the person in search suggestions or even if you find them you won’t be able to visit their profile. If you get the following message “Sorry, this content isn’t available right now“, you have been blocked or the person might have deactivated their account.
Also, the person may have simply set their privacy settings so that their profile became unsearchable.
Check Friend List Of A Mutual Friend
- Visit the profile of a mutual friend.
- Open the friend list from their profile.
- If you are not able to find the suspected person in their friend list, it means that you have been blocked, most likely.
Note: Even if the friend has a hidden Friend list still you can access your mutual friends on Facebook.
Ask A Friend
You may also ask a friend to check if they can see the suspected person’s profile.
If they are able to view the profile then surely you are on that person’s Block list on Facebook. It may be possible that the person has also blocked your friend as well. To be sure you can ask some other person to check the profile of that person.
If another person is also not able to access the profile of that user then most probably the account is not active anymore.
Bonus Tip: Determine Whether You Are Blocked On Facebook Or Account Is Deactivated
After checking the above steps follow this tip to tell if someone blocked you or the user has deleted/deactivated the Facebook account.
Open Facebook and go to Settings. Under Settings select Blocking. Enter the name of the person under Block users whom you suspect has blocked you and press Enter or click Block.
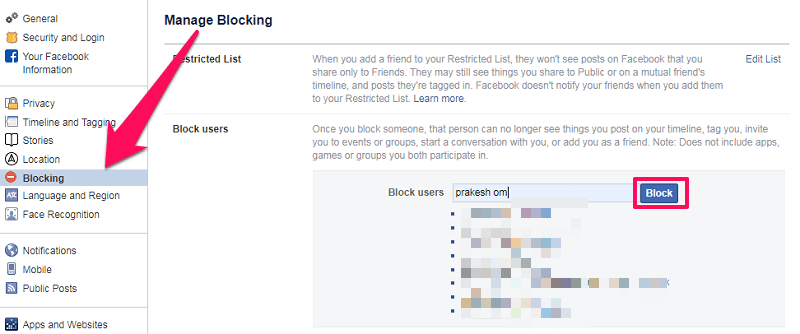
If you find that person’s name on searching then you are blocked. On the other hand, if you cannot find that user in the list after searching then it is highly likely that the user has deactivated their Facebook account and not blocked you.


Blocking on Google Plus
You can block anyone on Google Plus using the link at the bottom of their profiles:
You can unblock a user any time using the button next to his profile page.
1. How can the user find out he was blocked?
It’s hard to tell for sure: your profile will be displayed as normal to him. The blocked user will even be able to add you to circles.
The blocked user might find it weird that he can’t comment on your public update. Attempting to do so, he’ll get a standard error message:
2. If you block anyone, will you ever hear from him?
You won’t see the blocked user’s updates and he won’t be able to comment on your public updates, but you will still see his profile as normal.
3. If you block someone, will he be able to see your public profile page?
Yes, the blocked user can see your “public” posts as well as your public photos, links, etc.
Выход из системы
Как правило, вы также захотите дать вашим пользователям возможность
выйти из системы. К счастью, брандмауэр позволяет обрабатывать выход
автоматически, если вы активируете параметр в конфигурации:
Будучи настроенной для вашего брандмауэра, эта конфигурация при направлении
пользователя на (или любой другой путь, который вы укажете в
параметре ) будет де-аутентифицировать его. Этот пользователь будет
перенаправлен на главную страницу сайта (также может быть настроено при
помощи параметра ). Оба эти параметра — и
имеют параметры по умолчанию, такие же, как указаны в примере выше. Другими
словами, вы можете их не указывать, что упростит настройку:
Отметим также, что вам не нужно создавать контроллер для URL ,
так как брандмауэр сам позаботится обо всём. Возможно, вы также захотите создать
маршрут и использовать его для генерации URL:
Ban and unban users
History
- Hiding merge requests of banned users introduced in GitLab 15.8 with a flag named . Disabled by default.
- Hiding comments of banned users introduced in GitLab 15.11 with a flag named . Disabled by default.
- Hiding projects of banned users introduced in GitLab 16.2 with a flag named . Disabled by default.
GitLab administrators can ban and unban users.
You should ban a user when you want to block them and hide their activity from the instance.
A banned user:
- Is blocked from the instance. The banned user’s projects, issues, merge requests, and comments are hidden.
- Does not occupy a .
Ban a user
To block a user and hide their contributions, administrators can ban the user.
Users can be banned using the Admin area. To do this:
- On the left sidebar, at the bottom, select Admin.
- Select Overview > Users.
- For the user you want to ban, select the vertical ellipsis (), then Ban user.
Unban a user
History
A banned user can be unbanned using the Admin area. To do this:
- On the left sidebar, at the bottom, select Admin.
- Select Overview > Users.
- In the search box , filter by State=Banned and press Enter.
- For the user you want to unban, select the vertical ellipsis (), then Unban user.
The user’s state is set to active and they consume a
.
How To Block Someone On Twitter Using The Twitter App
Blocking a Twitter user is an easy process for mobile users, too. The Twitter app is near-identical for Android and iOS users, so these instructions should work across both platforms.
- To block a user on Twitter, open the Twitter app and search for the user, which you can do by tapping the Search icon in the bottom menu.
- Once you’re on a user’s profile, tap the three-dots menu icon in the top-right.
- In the menu that appears, tap the Block button. You can also tap Report instead to block and report abusive users.
- The Twitter app will ask you to confirm that you actually wish to block the user. Tap Block to confirm.
Twitter will immediately block the user as soon as you confirm your choice. As with the Twitter web interface, it’s easy to unblock the user in the future, should you wish to.
- Tap the Blocked button in the top-right corner of the blocked user’s profile.
- Twitter will ask you to confirm that you do wish to unblock the user’s account. Tap Yes to confirm.
Once confirmed, Twitter will unblock the user. Both parties will be able to interact with each other immediately at this point, but if you unblock a user by mistake, you can block them again immediately using the steps listed above.
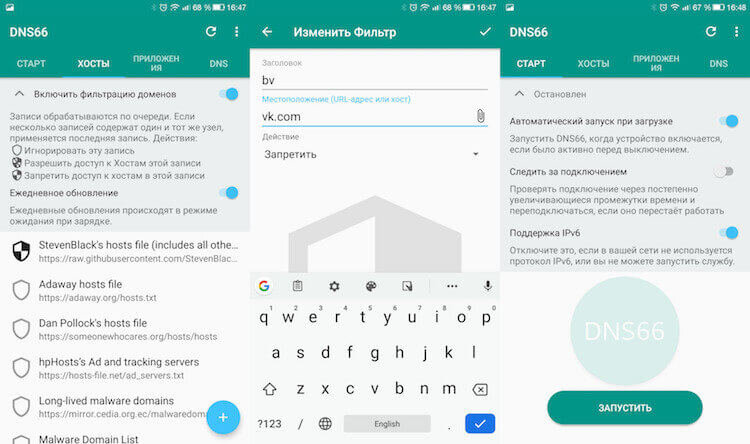
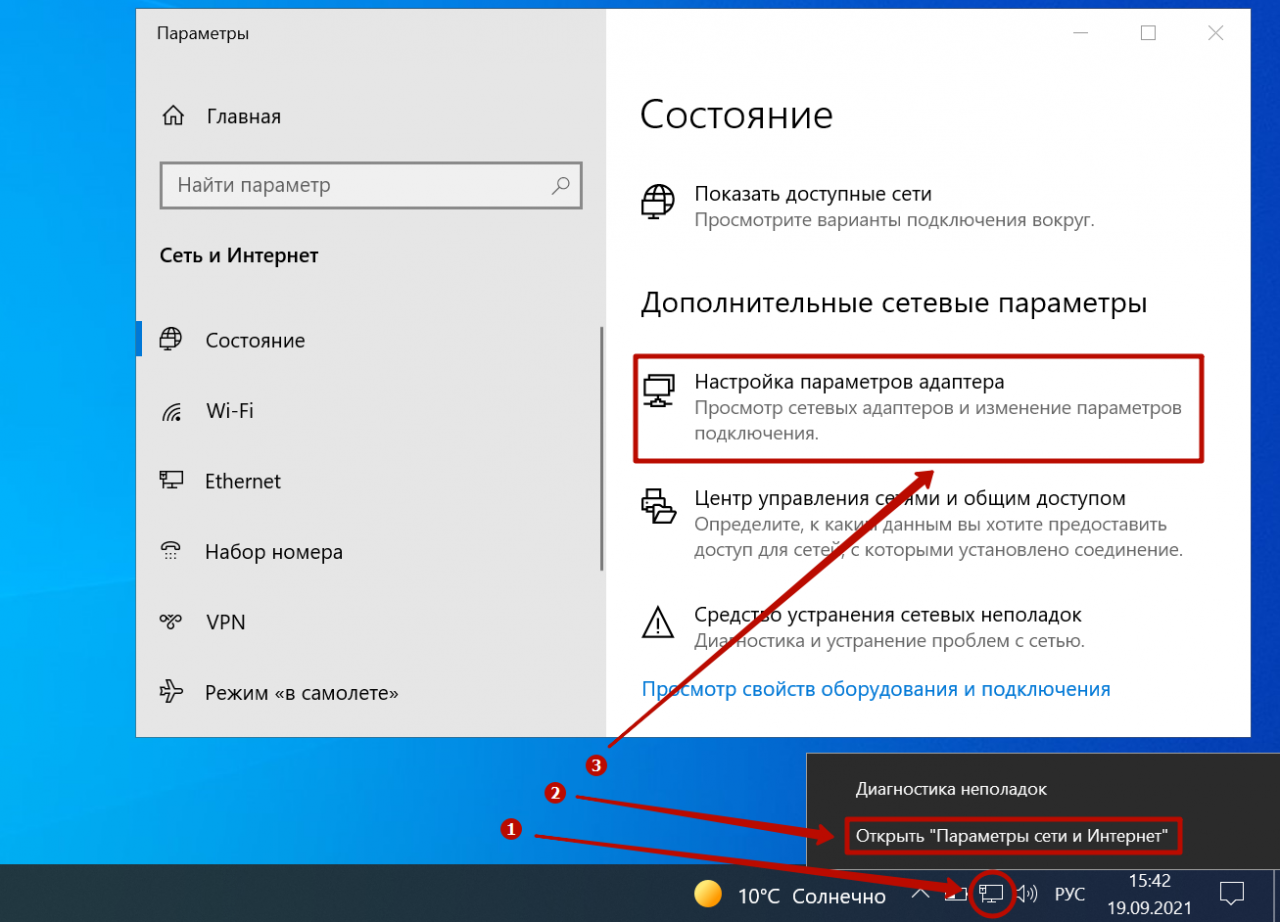
Как запретить доступ к сайту через маршрутизатор
Блокировка порталов через роутер – один из наиболее удобных способов, так как позволяет ограничить доступ к ресурсу, как только для одного устройства, так и для нескольких.
На некоторые моделях роутеров даже присутствует возможность установки временных рамок, когда платформа не будет функционировать, например, с 21:00 до 7:00.
Также может быть доступен выбор календарных дней и прочие опции, что зависят от конкретной модели роутера.
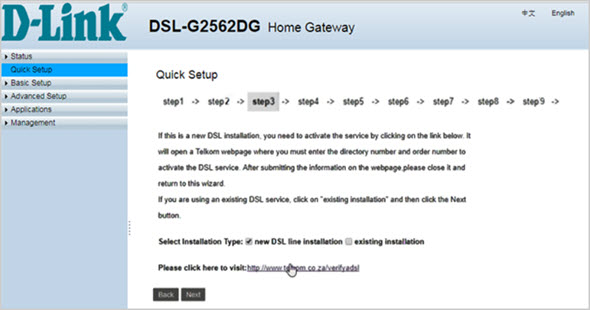
Все маршрутизаторы можно условно разделить на те, что пользуются спросом у ряда производителей: D-Link, TP-Link, Asus и др.
Стоит отметить, что даже если роутеры разработаны одной компанией, то в разных моделях интерфейс настроек может все равно отличаться.
D-link
Для блокировки веб-сайта в роутере этого бренда потребуется зайти во вкладку «Advanced», затем перейти в раздел «Filter», а после выбрать опцию «Domain Blocking» и ввести необходимый URL-адрес.
TP-Link
В этих роутерах наиболее обширный перечень доступных настроек, что делают блокировку наиболее удобной и позволяют адаптировать под собственные потребности.
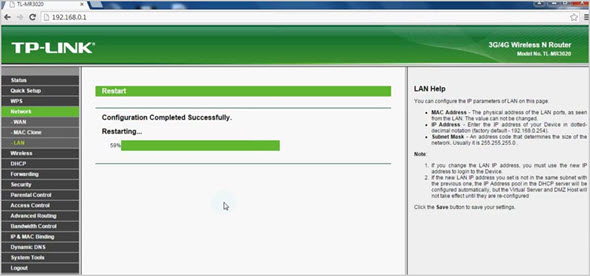
Пользователи смогут создавать списки заблокированных сайтов для конкретных устройств, выбирать время и другие параметры.
Для блокировки потребуется зайти во вкладку «Access Control», выбрать раздел «Host» и нажать кнопку «Add new», после чего выбрать устройство и ввести адрес площадки.
Asus
В отличие от вышеперечисленных моделей роутеров, маршрутизаторы этого бренда обладают русскоязычным интерфейсом.
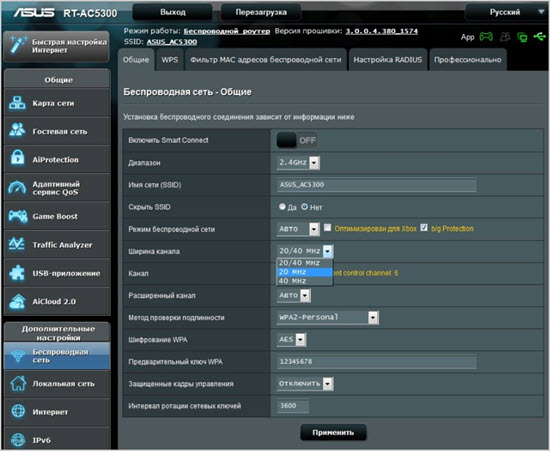
Пользователям нужно зайти в раздел «Настройки», выбрать раздел «Брандмауэр», а после перейти во вкладку «Фильтр URL-адресов», где нужно будет ввести доменное имя веб-сайта.
Users pending approval
A user in pending approval state requires action by an administrator. A user sign up can be in a
pending approval state because an administrator has enabled any of the following options:
- setting.
- .
When a user registers for an account while this setting is enabled:
- The user is placed in a Pending approval state.
- The user sees a message telling them their account is awaiting approval by an administrator.
A user pending approval:
- Is functionally identical to a user.
- Cannot sign in.
- Cannot access Git repositories or the GitLab API.
- Does not receive any notifications from GitLab.
- Does not consume a .
An administrator must to allow them to
sign in.
View user sign ups pending approval
History
To view user sign ups pending approval:
- On the left sidebar, at the bottom, select Admin.
- Select Overview > Users.
- In the search box, filter by State=Pending approval, and press Enter.
Approve or reject a user sign up
History
A user sign up pending approval can be approved or rejected from the Admin area.
To approve or reject a user sign up:
- On the left sidebar, at the bottom, select Admin.
- Select Overview > Users.
- In the search box, filter by State=Pending approval and press Enter.
- For the user sign up you want to approve or reject, select the vertical ellipsis (), then Approve or Reject.
Approving a user:
- Activates their account.
- Changes the user’s state to active.
- Consumes a subscription .
Rejecting a user:
- Prevents the user from signing in or accessing instance information.
- Deletes the user.
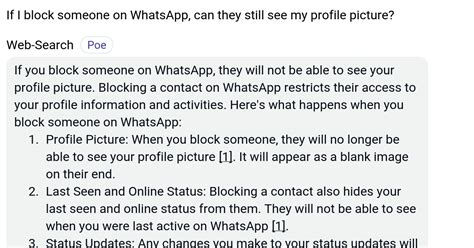
In the event that you block someone, can they still view your chats?
The chat history you had with them will no longer be visible on your phone, but it will remain visible on theirs. Therefore, any messages that you have saved between you will still be visible to them. However, you won’t be able to see those messages.
There are a ton of reasons to block someone on Snapchat—they bombard you with selfies, they’re your ex, they keep using the same tired filters—but the best one of them all might be that you’re feeling particularly irate. Nobody will judge you if you choose Kim Kardashian over this friend because they are both vying for your attention on the app.
Consequently, if you’re ready to stop putting up with your friend going full Animorph, we’re here to explain exactly how to block someone on Snapchat and why this is different from simply removing them from your friends list.
Fundamentally speaking, it’s fairly straightforward, but if there’s one thing social media is about, it’s obsessing over insignificant details.
If i block someone on duo can they still see my messages – (Image Source: Pixabay.com)
How to block someone on Discord
How to block someone on Discord using PC or Mac
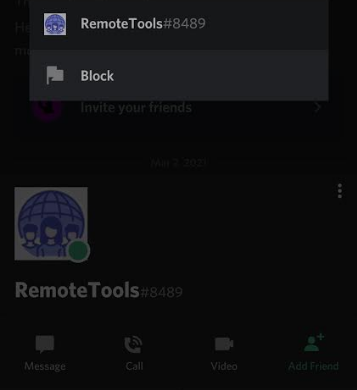
To block someone on Discord on PC or Mac, open up the Discord server, and right-click on the person’s name.
A menu will appear when you do so. Here, select ‘Block’.
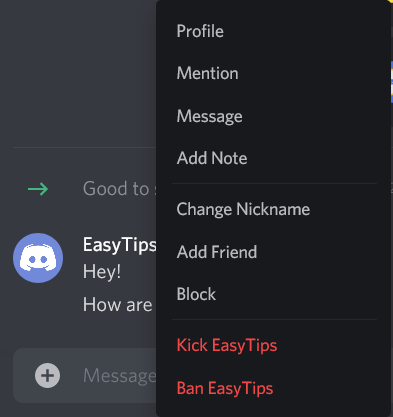
A confirmation message asking if you’re sure you want to block them will appear. Confirm this by selecting ‘Block’ again.
All the messages in your server from this person will disappear on your screen.
How to block someone on Discord using iPhone or Android devices
When using the Discord mobile app, tap the profile picture of the person you wish to block.
A menu will open on doing so. Click on the three dots at the top corner of this menu.

Select ‘Block.’ You will receive a confirmation alert mentioning that the user has been blocked.
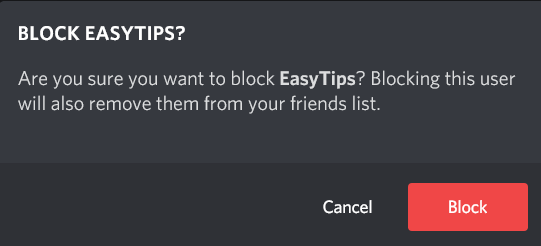
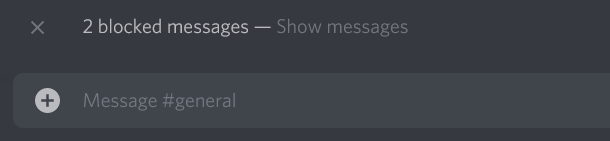
On blocking the person, they will be removed from your friends’ list, and all their messages in the server you share with them will be hidden. If you want to view their messages after blocking them, you can do so by selecting the ‘Show message’ button on your desktop or ‘Blocked messages’ tab on the mobile app.
The user you’ve blocked will not be able to ping you or ‘@’ mention your username in shared servers. They will receive the error message as told in the first section if they do try to message you.

What Happens to Story When You Block Someone
Is blocking on Instagram story different? You cannot block someone on the Instagram story. You can only mute or hide stories. Muting a story will hide the other person’s story from your profile and with the hide option, you can restrict your story from their view.
Can Blocked Accounts See Your Instagram Stories
No, blocked accounts cannot see your Instagram story as your profile isn’t visible to them. Similarly, you cannot see their stories.
If I Block Someone on Instagram, Can They See I Viewed Their Story
If you accidentally viewed your ex’s (or someone else’s) Instagram story and then decided to block them, the blocked user won’t be able to see that you viewed their story.
Blocking on Facebook
Facebook lets you block any member using the “Report / Block This Person” link at the bottom of the profile:
This is how it looks if you are not friends with the user:
And here’s how it looks if you are friends:
To unblock a user, you’ll need to click “Account” in the top-right corner of your home page, select “Privacy Settings”, scroll down and click “Edit your lists” below the “Block users” section.
1. How can the user find out he was blocked?
If you were previously friends, the blocked user might notice something strange: not only will he lose any traces of you, he won’t even be able to follow any link to your name. For example, if he had a Facebook message from you, he won’t see your name linked in it and he won’t see your picture:
Before blocking:
After blocking:
2. If you block anyone, will you ever hear from him?
No, Facebook removes any mentions of that person for you. Once you block someone on Facebook, you won’t see if the blocked user and you are going to the same event, if you were both tagged in one note or if you were both mentioned anywhere.
You won’t even see any mention of the blocked user in Facebook search results.
3. If you block someone, will he be able to see your public profile page?
If the user is signed in to Facebook, he’ll see an error page returned for your Facebook profile URL:
If the user logs out, he’ll see your standard Facebook profile (that’s another way for him to know if he was blocked):
FAQs About What Happens When You Block Someone on Instagram
If You Block Someone on Instagram, Will They Know
While Instagram doesn’t notify the blocked user directly, he/she could get suspicious if they are unable to view your profile.
How to know if someone blocked you on Instagram?
There are many ways to identify that. For instance, open their profile via tags or comments and see if you get the No posts error. You can also check from a different profile and see if you are able to see the profile that blocked you.
Can you block someone from commenting only?
Yes. You can block someone from commenting on your Instagram posts. Go to Instagram Settings > Comments. Under Block Comments From, add the people who you don’t want to comment on your posts. Please note that blocking someone from commenting on your posts will not block them from accessing your new or old posts, stories, and messages. Their old comments will also stay. The only thing that will change is that won’t be able to make new comments.


What is the difference between restrict and block on Instagram?
Restricting someone on Instagram only prevents them from commenting and messaging you. The user can still see your profile. On the contrary, blocking a profile completely prevents the user from seeing your profile. Know the detailed difference between block and restrict on Instagram.
Can you see who searched for you on Instagram?
No, you cannot know who searched or viewed your Instagram profile.
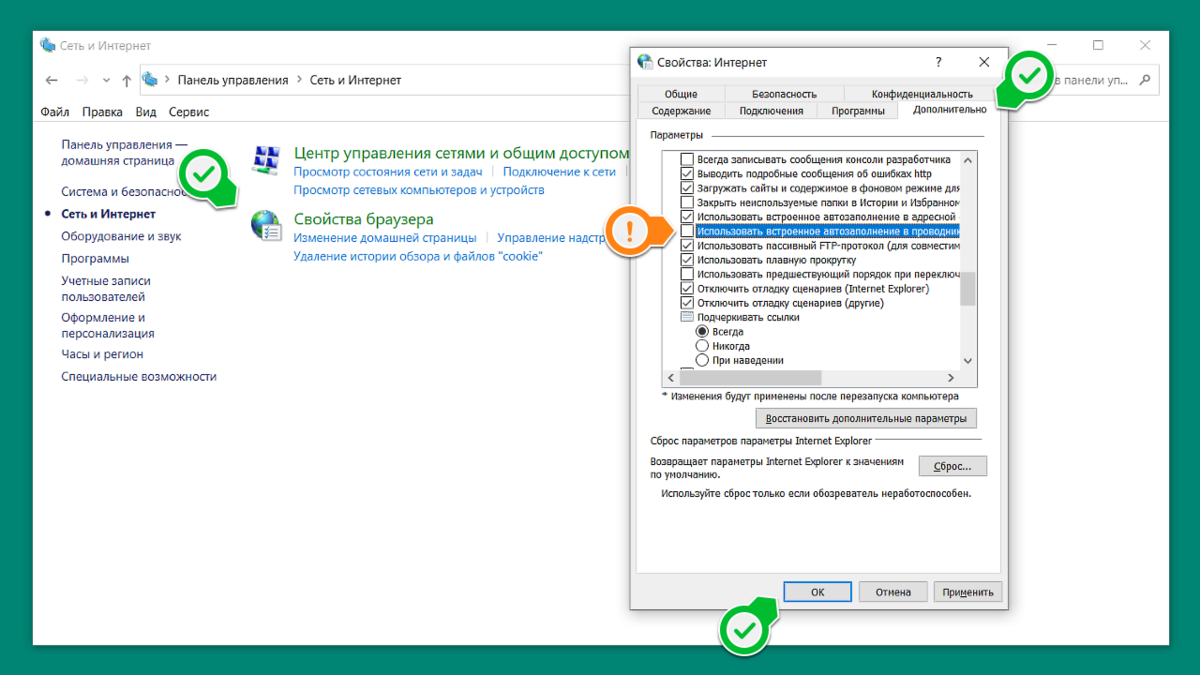
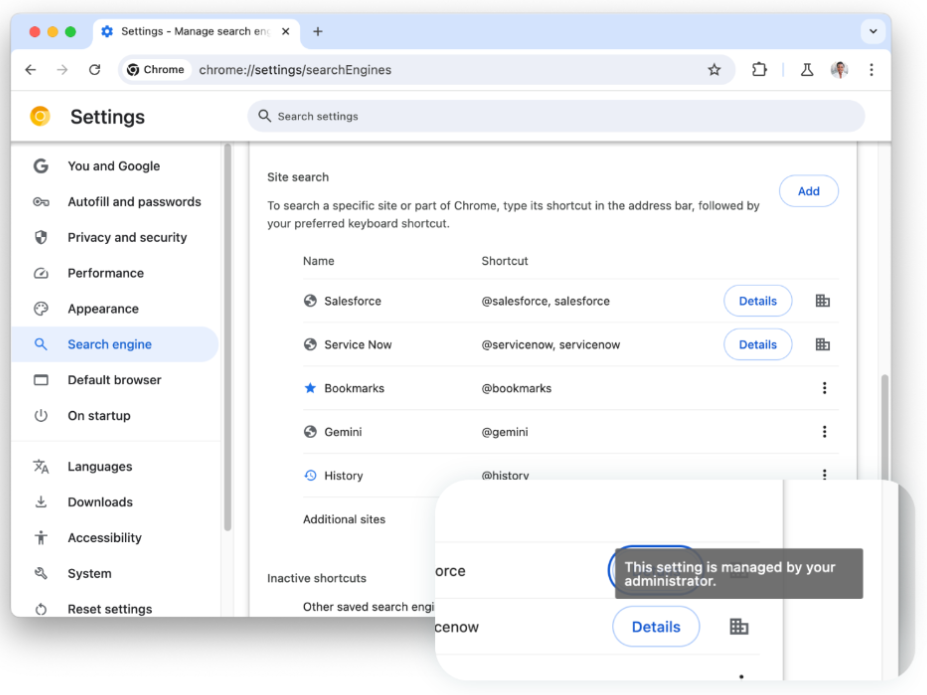
Когда используются списки запрещенных и разрешенных URL
Списки запрещенных и разрешенных URL позволяют управлять доступом на базовом уровне. Если вам необходима более строгая фильтрация, вы можете использовать прокси-сервер или расширение.
Используйте списки запрещенных и разрешенных URL, если нужно:
- Разрешить доступ ко всем URL, кроме запрещенных. С помощью списка запрещенных URL можно заблокировать пользователям доступ к определенным сайтам, сохранив при этом доступ к остальным.
- Заблокировать доступ ко всем URL, кроме разрешенных. Вы можете заблокировать доступ ко всем URL с помощью черного списка, а затем добавить разрешенные сайты в белый список.
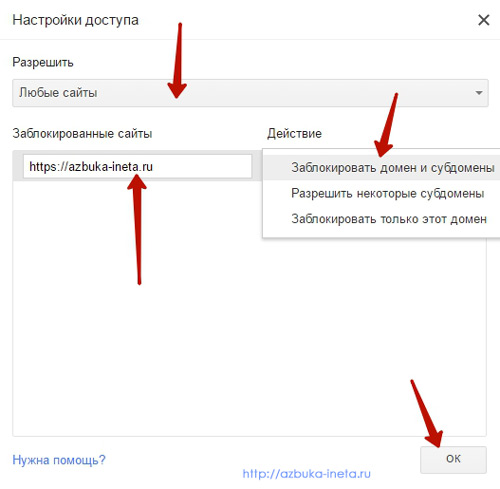
- Задать исключения из списка запрещенных URL. С помощью списка запрещенных URL можно закрыть доступ ко всем URL, а затем добавить в список разрешенных ресурсов отдельные схемы, субдомены других доменов, порты или адреса.
- Разрешить браузеру Chrome открывать приложения. Можно добавить в список разрешенных URL внешние обработчики протоколов, чтобы заданные приложения открывались в браузере автоматически.
Иногда списки запрещенных и разрешенных URL не работают должным образом. Например, если вы добавили в список запрещенных URL весь сайт, а определенную страницу с этого сайта занесли в список разрешенных, пользователи смогут перейти и на другие страницы этого сайта.
Если для аутентификации используется система единого входа на базе SAML или OpenID Connect или сетевое подключение выполняется через страницу входа вне пользовательского сеанса, то, чтобы заблокировать или разрешить загрузку некоторых URL на экранах входа и заблокированных экранах, используйте правила DeviceAuthenticationURLBlocklist и DeviceAuthenticationURLAllowlist.
Подробную информацию можно найти в разделах и .
Исключения из списка запрещенных URL
Не рекомендуется блокировать некоторые URL. К ним относятся:
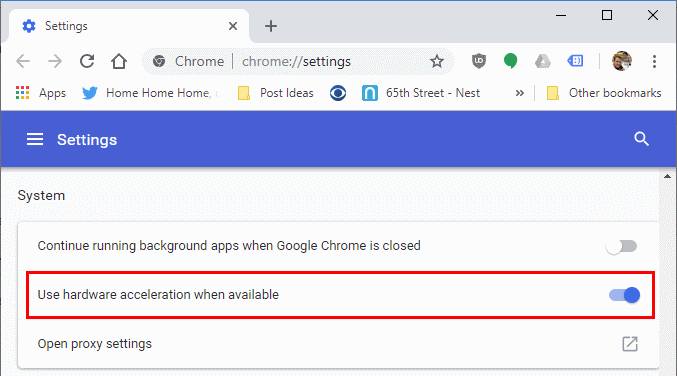
- chrome://settings
- chrome://os-settings
- chrome-untrusted://
URL chrome://settings и chrome://os-settings являются частью операционной системы ChromeOS и браузера Chrome. Они не должны быть заблокированы.
Даже если один из этих URL будет заблокирован, пользователи смогут обойти блокировку с помощью команд JavaScript и открыть страницы. Например, если вы заблокируете подстраницу Wi-Fi chrome://os-settings/networks?type=WiFi, пользователи по-прежнему смогут открыть ее с помощью консольных команд JavaScript.
Системные компоненты ChromeOS используют схему chrome-untrusted://, чтобы обрабатывать данные пользователей и веб-страниц. Не блокируйте этот URL, так как это может привести к сбоям в работе некоторых системных компонентов. Эта специальная схема URL позволяет Google безопасно обрабатывать любые данные, не относящиеся к операционной системе ChromeOS, используя все средства защиты, которые реализованы в браузере Chrome. При этом данные не могут получить доступ к функциям, зарезервированным для системных компонентов. Схема chrome-untrusted:// используется всегда, когда системный компонент может обработать данные, полученные от пользователя, или контент веб-страницы.
Если вам нужно заблокировать chrome://settings, chrome://os-settings или chrome-untrusted://, используйте правило SystemFeaturesDisableList. В результате будут заблокированы все настройки, а не только их часть. Не используйте для этого правила URLallowList и URLblockList. Подробнее …
Если вы хотите запретить доступ к какой-либо странице, определите, что именно на ней вы хотите заблокировать. Затем вы можете обратиться в службу поддержки ChromeOS или браузера Chrome и объяснить, какие правила вам для этого нужны. У разработчиков появится возможность добавить правило для определенных функций, и вы сможете обойтись без блокировки.
Identity User Lockout Configuration
To enable the User Lockout in Identity use the IdentityOptions object to configure it in the Program.cs class.
We enabled the ASP.NET Core Identity User Lockout feature is by setting the AllowedForNewUsers property to “true”. Additionally, we also configured a lockout time span to 10 minutes from the property called DefaultLockoutTimeSpan. We also set maximum failed login attempts to three from another property called MaxFailedAccessAttempts.
The AspNetUsers table of Identity database has 3 columns to store lockout settings of a user. These are:
- LockoutEnabled column will specify if user’s lockout is enabled or not.
- AccessFailedCount column value will increase for every failed login attempt and reset once the account is locked out.
- LockoutEnd column will have a DateTime value to represent the period until this account is locked out.
We have shown them in the below screenshot.
When a user forgets his/her password then he/she should be able to reset the password.
Check how this feature is created at – Creating Password Reset feature in ASP.NET Core Identity
Заключение
Безопасность может быть весьма сложным вопросом для решения его в вашем
приложении. К счастью, компонент безопасности Symfony следует хорошо
зарекомендовавшей себя модели, основанной на аутентификации и
авторизации. Аутентификация, которая всегда идёт первой, обрабатывается
брандмауэром, чья работа заключается установить “личность” пользователя
при помощи любого из доступных методов (HTTP аутентификация, форма логина и т.д.).
В книге рецептов вы также найдёте примеры других методов аутентификации,
включая то, как реализовать функцию “запомнить меня” при помощи куки.